ELK (Elasticksearch + Logstash + Kibana)
| 수정일 | 수정 내용 | 수정자 |
|---|---|---|
| 2022. 03. 31 | 최초 작성 | cs 김태현 |
시스템 목표
- 기존 scouter 모니터링 Tool은 Window 기반의 응용이므로 환경 제약이 존재
- 공통 환경인 Web 기반의 로그 확인을 위함
- 부가적으로 Rest호출 방식을 통한 추가적인 서비스 가능 (확장성)
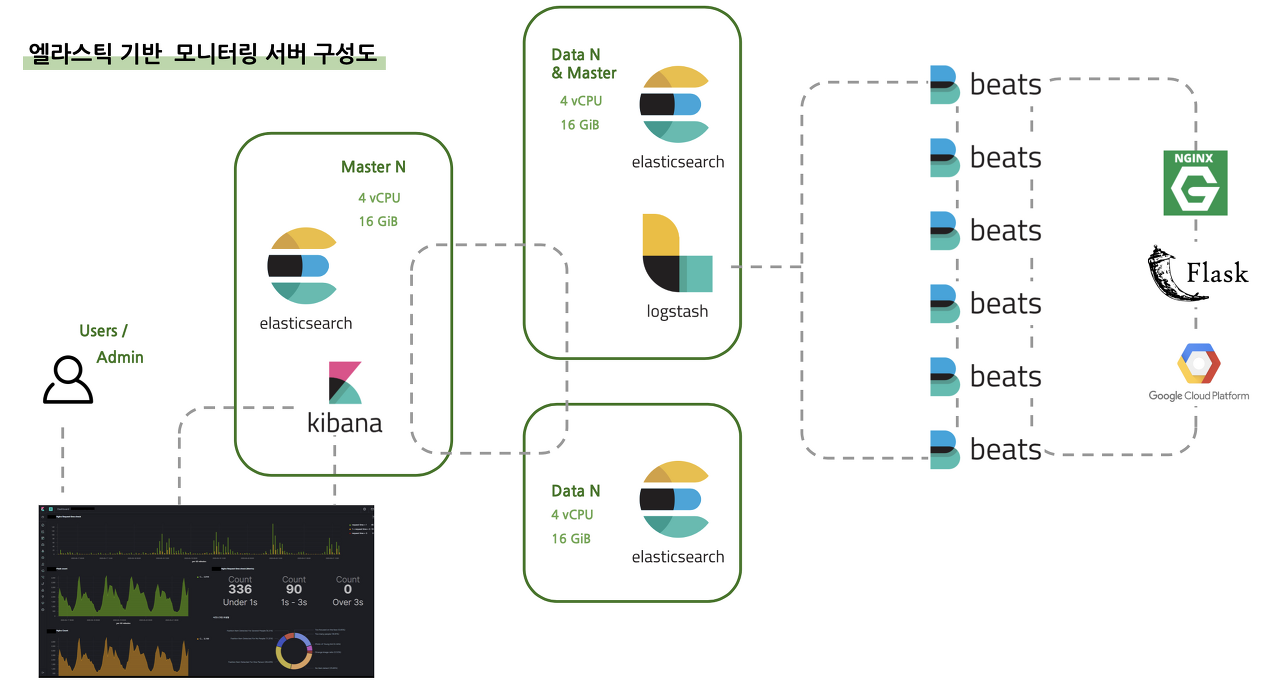
기존 scouter 시스템 구성

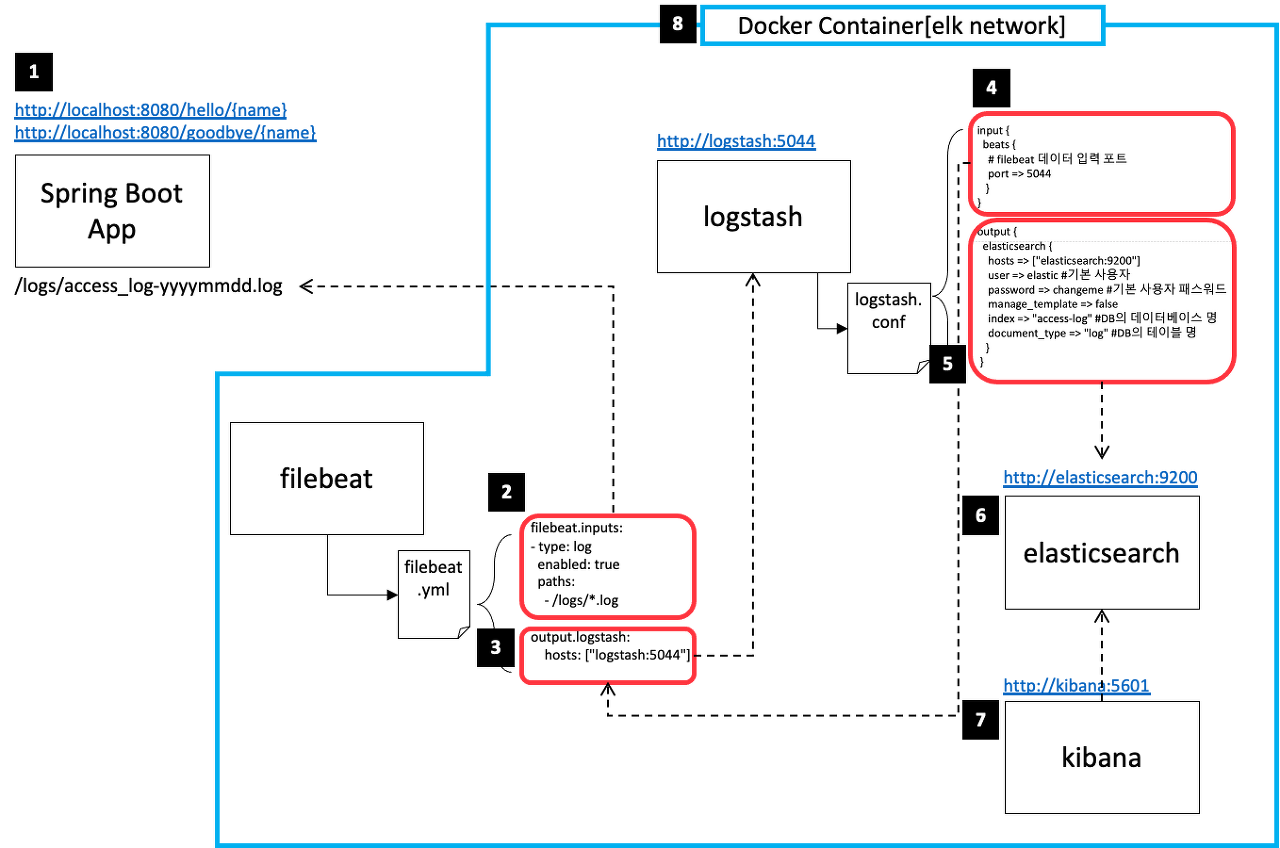
ELK 시스템 구성


설치 요구사항
[ 참고 url ] https://www.elastic.co/guide/kr/elasticsearch/reference/current/gs-installation.html
Java 8 이상 (Java 11 추천)
설치 가이드
1. jdk 설정:
-
JAVA_HOME 설정
# vi /etc/profile export JAVA_HOME=/elk/jdk/zulu11.54.25-ca-jdk11.0.14.1-linux_x64 export PATH=$JAVA_HOME/bin:$PATH export JAVA_OPTS=Dfile.encoding=UTF-8 export CLASSPATH="." -
적용
$ source /etc/profile -
ssh 재접속
-
설치확인
$ echo $JAVA_HOME -
설치 버전 확인
$ java -version
2. Elasticsearch + Kibana 설치 :
설치 경로 : https://www.elastic.co/kr/start
설치 형태 : https://www.elastic.co/guide/en/elasticsearch/reference/current/install-elasticsearch.html
-
기본 옵션 및 필수 속성 설정:
# vi /usr/local/elasticsearch/config/elasticsearch.yml # ---------------------------------- Cluster -------------------------------- # cluster.name: wini # # ------------------------------------ Node --------------------------------- # node.name: node_master # # ----------------------------------- Paths --------------------------------- # path.data: /elk/elasticsearch/elasticsearch/data path.logs: /elk/elasticsearch/elasticsearch/logs # # ----------------------------------- Memory -------------------------------- # bootstrap.memory_lock: true # # ---------------------------------- Network -------------------------------- # network.host: 0.0.0.0 http.port: 9200 # --------------------------------- Discovery ------------------------------- discovery.seed_hosts: ["0.0.0.0"] cluster.initial_master_nodes: ["node_master"] # ---------------------------------- Various ------------------------------- action.auto_create_index: .monitoring*,.watches,.triggered_watches,.watcher-history*,.ml* cluster.initial_master_nodes: ["node_master"] # # --------------------------------- Discovery ------------------------------- # filebeat- 로 시작하는 인덱스는 자동 인덱스 생성 활성화 설정 action.auto_create_index: filebeat-* #----------------------- BEGIN SECURITY AUTO CONFIGURATION ------------------ # Enable security features xpack.security.enabled: false xpack.security.enrollment.enabled: false #----------------------- END SECURITY AUTO CONFIGURATION -------------------- -
elasticsearch 데이터 확인
$ curl -X GET http://localhost:9200/classes?pretty


  # [wini@localhost kibana]$ curl -X GET http://localhost:9200/classes?pretty
  # {
  #   "error" : {
  #     "root_cause" : [
  #       {
  #         "type" : "index_not_found_exception",
  #         "reason" : "no such index [classes]",
  #         "resource.type" : "index_or_alias",
  #         "resource.id" : "classes",
  #         "index_uuid" : "_na_",
  #         "index" : "classes"
  #       }
  #     ],
  #     "type" : "index_not_found_exception",
  #     "reason" : "no such index [classes]",
  #     "resource.type" : "index_or_alias",
  #     "resource.id" : "classes",
  #     "index_uuid" : "_na_",
  #     "index" : "classes"
  #   },
  #   "status" : 404
  # }
3. Logstash 설치
- 설치 테스트
-
테스트 conf 추가
# vi /elk/logstash/logstash/config/test.conf input{ stdin {} } output{ stdout {} } -
실행
# 명령어 실행 $ ./logstash -f /elk/logstash/logstash/config/test.conf -
테스트
[2022-04-08T13:57:59,153][INFO ][logstash.agent ] Pipelines running {:count=>1, :running_pipelines=>[:main], :non_running_pipelines=>[]} The stdin plugin is now waiting for input: hello { "event" => { "original" => "hello" }, "@version" => "1", "host" => { "hostname" => "localhost.localdomain" }, "@timestamp" => 2022-04-08T04:58:42.697938Z, "message" => "hello" } -
logstash-filebeat.conf 설정으로 실행
-
설정
#vi /elk/logstash/logstash/config/logstash-sample.conf input { beats { port => 5044 } } output { elasticsearch { hosts => ["http://localhost:9200"] index => "%{[@metadata][beat]}-%{[@metadata][version]}-%{+YYYY.MM.dd}" #user => "elastic" #password => "changeme" } } -
실행
$ ./logstash -f /elk/logstash/logstash/config/logstash-sample.confconf 파일은 절대 경로로 실행 할것 ../ 으로 경로로 실행할 경우 파일을 제대로 못찾는 버그가 있음
-
-
4. Filebeats 설치
설치 방법 : https://www.elastic.co/guide/en/beats/filebeat/8.1/filebeat-installation-configuration.html
설치 경로 : https://www.elastic.co/kr/downloads/beats/filebeat
filebeat는 권한 설정에서 excute 권한은 필히 주지 않을것!!
-
filebeat.yml 설정
# vi /elk/filebeat/filebeat/filebeat.yml # ========================= Filebeat inputs ========================== - type: log enabled: true paths: # 수집할 로그 위치 - /winitech/kacl/logs/*.log fields: # 수집하는 서버 명치 server_name: kacl # 수집하는 서버 로그 타입 log_type: apache-access # 패턴을 통해 log multiline 설정 ( 기준 timestamp ) multiline.pattern: '^[[0-9]{4}-[0-9]{2}-[0-9]{2}' multiline.negate: true multiline.match: after # ============================== Outputs ============================== # Elasticsearch Output 주석 처리하기 # --------------------------- Logstash Output -------------------------- output.logstash: hosts: ["localhost:5044"] -
실행
$ ./filebeat -e -c filebeat.yml -
filebeat config 연결 테스트
$ ./filebeat test output --path.config /elk/filebeat/filebeat
5. Logstash Filter 적용
Logstash에서는 Filter를 통해 읽어 들이는 로그를 추출함
추출은 Grok 패턴을 따름
grok 정규식 예제 : https://github.com/logstash-plugins/logstash-patterns-core/blob/main/patterns/ecs-v1/grok-patterns
log 형태 참고 링크 : https://umbum.dev/1144
grok 정규식 테스트 사이트 링크 :
-
SpringBoot logback.xml 설정
``` 생략
<!-- 로그 패턴 -->
<property name="CONSOLE_LOG_PATTERN"
    value="%d{yyyy-MM-dd HH:mm:ss.SSS} %level %relative --- [ %thread{10} ] %logger{20} : %msg%n"/>
패턴에 특수 함수 들은 logstash 가 읽어들이때 특수 문자로 치환되므로 제거해야함
-
logstash.yml 설정
# vi /elk/logstash/logstash/config input { beats { port => 5044 } } filter { grok { match => { "message" => "%{TIMESTAMP_ISO8601:timestamp} %{LOGLEVEL:logLevel} %{BASE10NUM} --- \[ %{GREEDYDATA:thread} \] %{GREEDYDATA:logger} \: %{GREEDYDATA:msg}" } } date { match => ["timestamp", "yyyy-MM-dd HH:mm:ss.SSS"] target => "@timestamp" timezone => "Asia/Seoul" } } output { elasticsearch { hosts => ["http://localhost:9200"] index => "%{[@metadata][beat]}-%{[@metadata][version]}-%{+YYYY.MM.dd}" #user => "elastic" #password => "changeme" } } -
grok 예제
-
원문
2022-04-11 15:06:27.324 ERROR 19496 --- [ Camel (camel-1) thread #12 - timer://EAWS ] c.w.cs.CAMEL.Kacl003 : EAWS org.springframework.web.client.HttpClientErrorException$NotFound: 404 : [{"timestamp":"2022-04-11T06:06:27.881+00:00","status":404,"error":"Not Found","message":"","path":"/EQCALL"}] -
grok
%{TIMESTAMP_ISO8601:timestamp} %{LOGLEVEL:logLevel} .*%{BASE10NUM:num} --- \[ %{GREEDYDATA:thread} \] %{GREEDYDATA:logger} \: %{GREEDYDATA:msg} -
결과
{
  "timestamp": [
    [
      "2022-04-11 15:06:27.324"
    ]
  ],
  "YEAR": [
    [
      "2022"
    ]
  ],
  "MONTHNUM": [
    [
      "04"
    ]
  ],
  "MONTHDAY": [
    [
      "11"
    ]
  ],
  "HOUR": [
    [
      "15",
      null
    ]
  ],
  "MINUTE": [
    [
      "06",
      null
    ]
  ],
  "SECOND": [
    [
      "27.324"
    ]
  ],
  "ISO8601_TIMEZONE": [
    [
      null
    ]
  ],
  "logLevel": [
    [
      "ERROR"
    ]
  ],
  "num": [
    [
      "19496"
    ]
  ],
  "thread": [
    [
      "Camel (camel-1) thread #12 - timer://EAWS"
    ]
  ],
  "logger": [
    [
      "c.w.cs.CAMEL.Kacl003 : EAWS org.springframework.web.client.HttpClientErrorException$NotFound: 404"
    ]
  ],
  "msg": [
    [
      "[{"timestamp":"2022-04-11T06:06:27.881+00:00","status":404,"error":"Not Found","message":"","path":"/EQCALL"}]"
    ]
  ]
}
-
op1. 방화벽 설정
9200 : elasticsearch
5601 : kibana
# elasticsearch
$ firewall-cmd --zone=public --permanent --add-port=9200/tcp

# kibana
$ firewall-cmd --zone=public --permanent --add-port=5601/tcp

# logstash
$ firewall-cmd --zone=public --permanent --add-port=5044/tcp

# 재기동
$ firewall-cmd --reload
99. 추가 설정
1) 심볼링크 설정
- 심볼링크 설정:
# 각 해당 경로에서 아래 명령어 적용

# elasticsearch
$ ln -s elasticsearch-7.9.1-linux-x86_64 elasticsearch

# kibana
$ ln -s kibana-8.1.1 kibana

# logstash
$ ln -s logstash-8.1.2 logstash
2) alias 설정
-
alias 추가
#vi /etc/bashrc # elasticsearch alias es="cd /elk/elasticsearch/elasticsearch" # kibana alias kiba="cd /elk/kibana/kibana" # logstash alias logs="cd /elk/logstash/logstash" -
alias 적용
$ source /etc/bashrc
3) 서비스 등록
-
systemctl 등록 :
엘라스틱서치를 시작할때 systemctl 쓰지말자 : https://aimb.tistory.com/225
라는 의견도 있으니 참고 할것
-
elasticsearch.service
#vi /lib/systemd/system/elasticsearch.service [Unit] Description=Elasticsearch Cluster Documentation=https://www.elastic.co/kr/products/elasticsearch Wants=network-online.target After=network-online.target [Service] RuntimeDirectory=elasticsearch-8.1.1 WorkingDirectory=/elk/elasticsearch/elasticsearch LimitMEMLOCK=infinity LimitNOFILE=65535 LimitNPROC=4096 ExecStart=/elk/elasticsearch/elasticsearch/bin/elasticsearch ExecReload=/elk/elasticsearch/elasticsearch/bin/elasticsearch RestartSec=3 User=wini Group=root [Install] WantedBy=multi-user.target -
kibana.service
# vi /lib/systemd/system/kibana.service [Unit] Description=Kibana 8.1 [Service] RuntimeDirectory=Kibana 8.1 WorkingDirectory=/elk/elasticsearch/elasticsearch Environment=CONFIG_PATH=/elk/kibana/kibana/config/kibana.yml ExecStart=/elk/kibana/kibana/bin/kibana ExecReload=/elk/kibana/kibana/bin/kibana User=wini Group=root [Install] WantedBy=multi-user.target -
logstash.service
# vi /lib/systemd/system/logstash.service [Unit] Description=logstash 8.1.2 [Service] RuntimeDirectory=logstash 8.1.2 WorkingDirectory=/elk/logstash/logstash ExecStart=/elk/logstash/logstash/bin/logstash -f /elk/logstash/logstash/config/logstash.yml ExecReload=/elk/logstash/logstash/bin/logstash User=wini Group=root [Install] WantedBy=multi-user.target -
filebeat.service
# vi /lib/systemd/system/filebeat.service [Unit] Description=Filebeat sends log files to Logstash or directly to Elasticsearch. Documentation=https://www.elastic.co/products/beats/filebeat Wants=network-online.target After=network-online.target [Service] Environment="GODEBUG='madvdontneed=1'" Environment="BEAT_LOG_OPTS=" Environment="BEAT_CONFIG_OPTS=-c /elk/filebeat/filebeat/filebeat.yml" Environment="BEAT_PATH_OPTS= --path.data /elk/filebeat/filebeat/data" ExecStart=/elk/filebeat/filebeat --environment systemd $BEAT_LOG_OPTS $BEAT_CONFIG_OPTS $BEAT_PATH_OPTS ExecStart=/elk/filebeat/filebeat/filebeat -e -c /elk/filebeat/filebeat/filebeat.yml Restart=always [Install] WantedBy=multi-user.target -
systemctl 적용
$ systemctl daemon-reload
-
99. 이슈 사항
1. max virtual memory areas vm.max_map_count [65530] is too low, increase to at least [262144]

elasticsearch 구동 메모리 부족에 의한 오류
<<해결방법>>
-
vm max 메모리 수정
#vi /etc/sysctl.conf vm.max_map_count=262144 -
적용
$ sudo sysctl -w vm.max_map_count=262144
2. max file descriptors [4096] for elasticsearch process is too low, increase to at least [65535]
ERROR: [2] bootstrap checks failed. You must address the points described in the following [2] lines before starting Elasticsearch.
bootstrap check failure [1] of [2]: max file descriptors [4096] for elasticsearch process is too low, increase to at least [65535]
bootstrap check failure [2] of [2]: memory locking requested for elasticsearch process but memory is not locked
1개의 세션당 열 수있는 file descriptors 부족 오류
참조 링크 : https://soye0n.tistory.com/170
<<해결방법>>
-
file descriptors 수정
#vi /etc/security/limits.conf ## 마지막 줄에 추가 # 모든 세션 각 option 마다 65536으로 설정(Optional) #* hard nofile 65536 #* hard nofile 65536 #* hard nproc 65536 #* sort nproc 65536 # 모든 세션 모든 option을 unlimited 설정 * - memlock unlimited -
max_map_count 추가
#vi /etc/rc.local

echo 1048575 > /proc/sys/vm/max_map_count
#vi /etc/sysctl.conf vm.max_map_count=262144 -
memlock 설정 확인
$ ulimit -l
** 원문과 스크립트는 Git에 있습니다.
https://github.com/taehyeon3549/StudyAllOfThings/tree/master/ELK
GitHub - taehyeon3549/StudyAllOfThings: 자라 나라 지식 지식~!
자라 나라 지식 지식~! Contribute to taehyeon3549/StudyAllOfThings development by creating an account on GitHub.
github.com
'머리 뜯으며 개발 > 기타' 카테고리의 다른 글
| WPF, C# ] TabControl의 SelectionChanged가 ListView에도 영향을 줄때 (0) | 2020.07.02 |
|---|---|
| WPF, C# ] TabControl의 Tab 선택 이벤트 (0) | 2020.07.01 |
| WPF, C# ] MessageBox 확인버튼(YesNo), MessageBox 아이콘(MessageBoxImage) 삽입 및 확인버튼 이벤트 처리 (0) | 2020.07.01 |